

Key takeaways
- Choose a 1-gallon kit if space, storage and uncertainty are your main concerns. Choose a 2–2.5-gallon pressure-bottle system for convenient small batches and simplified packaging. Choose a 5-gallon extract kit with a bottling bucket, hydrometer and sanitizer if you want the best long-term value and…
The best beer brewing kits for beginners are usually 5-gallon extract kits for regular brewers, 1-gallon kits for small spaces and low-risk experimentation, and 2-gallon or 2.5-gallon systems for people who want simpler batches without committing to a full-size setup.
Our top picks
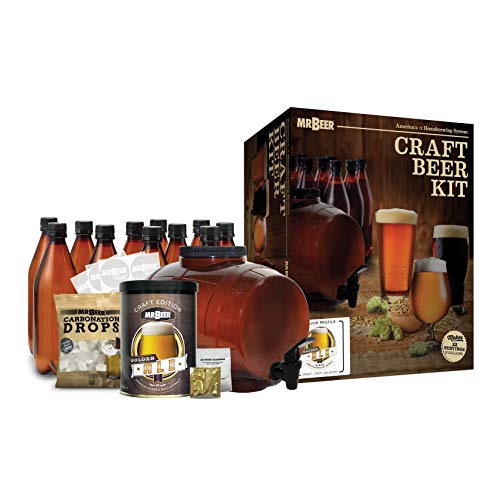

As an Amazon Associate we earn from qualifying purchases at no extra cost to you. Ratings are shown as listed on Amazon.
Quick picks by brewing situation
| Your situation | Best kit type | Typical batch | Typical starting cost | Why it fits |
|---|---|---|---|---|
| Lowest upfront cost | Small pressure-bottle kit | 1–2 gallons | $40–$90 | Uses compact equipment and often includes a beginner-friendly ingredient can |
| Limited counter or storage space | 1-gallon glass or plastic fermenter kit | 1 gallon | $60–$120 | Easy to lift, clean and store between batches |
| Best cost per bottle | 5-gallon extract starter kit | About 5 gallons | $120–$220 before ingredients | Produces roughly 40–50 12-ounce bottles per batch |
| Frequent brewing | 5-gallon kit with bottling bucket and reusable equipment | About 5 gallons | $160–$300 | Better long-term value and easier transfer between vessels |
| Want to avoid buying a large kettle | Extract kit with partial-boil instructions | 1–5 gallons | $100–$220 | Concentrated malt extract reduces the need for a full-volume boil |
What a beginner kit should include
A usable starter kit should cover fermentation, transferring, packaging and sanitation. At minimum, look for a fermenter with a lid, an airlock, a siphon or transfer device, a bottling wand, tubing, a hydrometer, caps or bottles, and no-rinse sanitizer. Ingredient kits may also include malt extract, hops and yeast, but equipment-only kits do not.
A brewing kettle is the most commonly omitted item. A 5-gallon kit may require a stainless-steel kettle holding at least 5 gallons, although many extract recipes permit a 2.5–3 gallon boil followed by chilled water in the fermenter. A 1-gallon kit usually needs only a 2–3 gallon kitchen pot. Check this before buying: a kit that appears complete can still leave you needing a kettle, thermometer and bottles.
Head-to-head: 1-gallon, 2-gallon and 5-gallon kits
1-gallon kits: easiest to store
A 1-gallon kit is a sensible first purchase when you are unsure whether brewing will become a hobby. A finished batch typically fills around eight to ten 12-ounce bottles, depending on sediment and transfer losses. The fermenter is light enough to move without much effort, and ingredient costs are often about $15–$35 per batch.
The trade-off is that small batches can change temperature quickly, and bottling takes nearly as many separate steps as a larger batch. Glass jugs are inexpensive and transparent, but they are breakable and can be awkward to clean. Food-safe plastic fermenters are lighter and safer around busy kitchens.
2-gallon and 2.5-gallon kits: the practical middle ground
Small pressure-bottle systems such as Mr. Beer’s kits are designed around compact batches and simplified ingredients. Depending on the package, they generally use a plastic fermenter and reusable PET bottles rather than a traditional glass-bottle setup. This size is useful for an apartment brewer who wants more beer than a 1-gallon kit produces without managing a full 5-gallon fermenter.
Expect approximately 16–24 12-ounce-equivalent servings from a 2–2.5 gallon batch. Ingredient refills commonly fall in the $15–$30 range, though specialty recipes can cost more. These systems are convenient, but proprietary or system-specific ingredients and bottles can limit flexibility compared with standard extract recipes.
5-gallon kits: best value for regular use
A standard 5-gallon extract kit is the strongest choice if you expect to brew several times a year or want to share bottles with friends. A batch yields roughly 40–50 12-ounce bottles after allowing for trub, transfer loss and headspace. Ingredient kits commonly cost about $30–$60 for a basic beer and roughly $45–$80 for more hop-heavy or specialty recipes.
Popular equipment suppliers including Northern Brewer, Craft A Brew and Brooklyn Brew Shop offer beginner-oriented kits or recipe packages, although the included equipment varies considerably. Some include a bottling bucket and bottle filler; others provide only a fermenter and basic accessories. Compare the contents line by line rather than choosing solely by the advertised batch size.
Best beginner kit types compared
| Kit type | Typical fermenter material | Equipment usually included | Ingredient cost per batch | Main limitation |
|---|---|---|---|---|
| 1-gallon recipe kit | Glass jug or PET plastic | Fermenter, airlock, siphon, sanitizer and recipe ingredients | $15–$35 | Small yield; bottling is still time-consuming |
| 2–2.5-gallon pressure-bottle kit | Food-safe plastic | Fermenter, lid, airlock or pressure cap, bottles and ingredient can | $15–$30 | Less compatible with standard brewing hardware |
| 5-gallon extract starter kit | Plastic bucket, PET or glass carboy | Fermenter, airlock, siphon, bottling equipment and sanitizer | $30–$80 | Needs more storage, cooling capacity and lifting space |
| 5-gallon deluxe kit | Plastic fermenters or stainless-steel additions | Basic equipment plus kettle, hydrometer, thermometer and bottling bucket | $30–$80 | Higher upfront price and more equipment to clean |
A worked cost comparison
Suppose a 5-gallon kit costs $180 and the first ingredient kit costs $50. If the batch produces 45 bottles, the first batch costs about $5.11 per bottle before accounting for your time, water and electricity:
($180 + $50) ÷ 45 bottles = $5.11 per bottle.
On the next batch, assuming the equipment is reusable and you buy another $50 ingredient kit, the cost falls to about $1.11 per bottle. That calculation explains why a 5-gallon kit makes more financial sense for frequent brewing, while a 1-gallon kit is better for reducing commitment and waste during your first attempt.
What to check before buying
Fermenter capacity and headspace
A fermenter should hold more than the target batch size. A 5-gallon beer may need a 6–7 gallon fermenter to leave room for foam during active fermentation. A tightly filled vessel can push krausen into the airlock, clog it and create a messy cleanup.
Cleaning and sanitation
Sanitation is more important than buying a premium kettle. Look for smooth interiors, wide openings and parts that can be disassembled. Scratches in soft plastic can harbor residue, so avoid abrasive scrubbers. Replace tubing when it becomes cloudy, cracked or difficult to clean; tubing and small gaskets are usually the first parts to wear.
Packaging method
Bottling is inexpensive but labor-intensive. A bottling bucket, spigot and spring-loaded filler make the process less frustrating than siphoning directly from a fermenter. PET bottles are lightweight and reusable, while glass bottles tolerate repeated use but require careful inspection for chips and cracks. A kegging setup is faster for serving but normally adds several hundred dollars for a keg, regulator, gas cylinder and compatible refrigerator or cooling system.
Temperature control
Most beginner kits do not include temperature control. Fermentation temperature affects the finished beer, so plan where the fermenter will sit before brewing. A stable, dark area is preferable to a sunny countertop with large temperature swings. If your home is warm, a plastic storage tub with water and occasional frozen bottles can provide basic moderation without buying a dedicated refrigerator.
Setup sequence that prevents common mistakes
- Confirm the recipe and equipment: Make sure you have a kettle, thermometer, sanitizer, fermenter, airlock and packaging supplies before heating water.
- Clean first, sanitize second: Cleaning removes visible soil; sanitizer reduces microorganisms on already-clean surfaces. One does not replace the other.
- Cool the wort before adding yeast: Follow the recipe’s temperature range rather than pitching into hot liquid, which can damage the yeast.
- Leave headspace: Do not fill the fermenter to its brim. Foam needs somewhere to go.
- Wait for stable gravity: Use the hydrometer as directed and confirm fermentation has finished before bottling. Premature packaging can create excessive pressure.
- Measure priming sugar: Use the recipe’s amount and dissolve it evenly. Guessing can produce flat beer or over-carbonated bottles.
- Label the batch: Record yeast, ingredients, dates and temperatures. Notes make the second batch more consistent.
Bottom line
Choose a 1-gallon kit if space, storage and uncertainty are your main concerns. Choose a 2–2.5-gallon pressure-bottle system for convenient small batches and simplified packaging. Choose a 5-gallon extract kit with a bottling bucket, hydrometer and sanitizer if you want the best long-term value and expect to brew regularly. Whichever size you choose, prioritize complete sanitation and clearly listed equipment over decorative extras or a low headline price.




Write Your Review
No reviews yet. Be the first to share your experience!